=VG= SemlerPDX
-
Posts
4665 -
Joined
-
Last visited
Content Type
Profiles
Forums
Events
Downloads
Gallery
Articles
AVCS Bug Reports (automated)
AVCS Bug Reports (manual)
VG Wiki
Blogs
Store
Everything posted by =VG= SemlerPDX
-
Dogfighting training is super simple: Press Instant Action, and get busy! You can worry about things like weight and balance later - first get familiar with the Dogfight mode systems and have fun with it. Seriously, though, it doesn't come up much, but it's good to practice. For setting controls and testing things, I always use Instant Action, and it's a turning game. Clean your monitor, cuz it's about finding that tiny bird on your tail and getting onto his tail. Cover the bits in the manual, learn the 330-440 rule (speeds for highest turning potential in CAT1) and watch your G's. The ACM of the Dogfight mode is a vertical slice for the turning battle, so it instantly locks onto a target in front, within 20 degrees. And EEGS is my favorite Guns mode, you can set this as well and test out the different modes in Instant Action much faster than a scheduled flight with RAMP/TAXI/ETC. The Guns funnel of the EEGS gives a great visual representation of where your cannon fire will go. Try for that one good short burst as you don't carry much ammo. Give it a try, you'll like it.
-
I've taken an idea past the design phase and nearly to the patent phase before I decided the venture would end up rather out of my scope, requiring a manufacturing investment on my part greater than 50% to retain ownership of my own idea and product. In that time, I learned a lot about such projects. Namely, you can't do it alone, and you'll need to protect yourself as you go. First step would be to form (in your country/province) a simple company that can hold the ownership of the assets and ideas, to which you are the controller. In America, a limited liability company would be the way to go, setup fees and process are very simple and online resources abound. Find something like that for yourself. From there, you can start to get help from one or more consultants or contributors, and for that you really want to have them sign a non-disclosure, non-circumventing, non-competing agreement. This makes it possible for you to share information that is sensitive with people you need to help you along the way. You will want to review and tailor to your needs, but here is an example: sample-NDA-NCV-NCP.txt *You must have forms like this created correctly or they may not be legally binding, make sure all information is correct, and all should be well.
-
Welcome to our website, @Blu3wolf! Very helpful & detailed info on combat flight training, thanks! @=VG= Kavelenko The difference with a real pilot vs. what we do is that we enjoy going out on whatever mission piques our interest, SEAD, Strike, Air Interdiction, CAP, CAS, etc. and in the real world, squadrons are built upon specialties in a majority of cases. Seems there are multi-role squadrons, but essentially, a majority of squadrons specialize in a specific task if I am not mistaken. This could get rather boring for the PC sim pilot, so it's good we're not so restricted, and also that VG is a very casual PvE COOP style group - frag whatever missions you want, and even severe losses of player controlled aircraft won't detract from the actual war effort significantly. A training track might start diverging near the end, while the beginning would be very streamlined. But having a couple different tracks for players to follow, what to read and when in the Dash1/Dash34 and Training Manuals, and references, would be very unique if they focused on giving the new player the essentials and offering those who want to know everything a deeper dive. If I wanted to train someone on the AIM-120C, in the F-16, they could breeze through the BVR training, or really get into it and even study a real world manual on the AIM-120C (I just looked around my PC and thought I had one of these, I remember diving deep in the training, but can't find that IRL slammer manual anywhere!). A training track for VG might include that deeper layer for those who want more, as well as self check tests, and maybe even some kind of formal public test with an already "certified" pilot at VG. We won't ever restrict who can fly at VG, but I agree that it would be nice to have a small flight school here, or at the very least an informal training track for people to follow to help guide them through the many manuals and aspects of flight training. _____ I had a mind to create several SOP's for the VG BMS Server, for regulars and newcomers alike, but I still have my own questions about how everything runs in this new version, so it's not the time for me personally to start creating instructional content, though I'd like to before too long. The materials already exist in the manuals, my only goal would be to make quick essentials guides heavy on info-graphics, leaving the deeper reading to those who want to know more. Fragging missions could be boiled down to a much more simple procedure, again leaving the details and nuanced bits for those who want to know more. It's really basic to right click on the map anywhere and add an Air Interdiction with one or three wingmen, I think it's the recon part that gets things complicated as well as the various types of missions. Fragging a CAP in Mig Alley requires far less recon and additional tasking vs. (for example) an OCA Strike Package, I hope that goes without saying. Someone might make a dirty 5 step guide to frag a CAP, for example, but might need at least 3 more steps for an OCA Strike due to the extra data on stationary targets, getting that info saved to the DTC, etc.
-
lol - yea. You must have been away at the time. It's a standalone, so you don't uninstall 4.33.5 if you don't want to, for example I still have 4.32 and 4.33 and now 4.34 installed on my PC, and can fire up any of them and fly. But yea, we're on 4.34 now, and there have been some notable changes to the radios and the SOP for taxi/takeoff/departure/approach/landing/etc. The presets have changed and Jeffu's guide on Radios in 4.34 talks all about it. Of course, complete information is in the included docs folder. The cockpit looks a little different, too, IIRC with the T-ILS knob missing, gone digital or something. I had to retrain for that, threw me for a loop first time I tried to come in for a landing in 4.34
-
I'd love to bring back the Medals and Ribbons module for this website. Was a great way to have a history of activity at VG over time, and gives us the ability to do things like that ensignia thingy if desired. I did it once for a series of game events, participants received campaign ribbons for their profile that included the date of the event, and a special one for those who all three parts of the event. I miss that. Thing is, I looked into it, and I don't want to pay for some IPS module that someone else did (annual renewal fees, ug!), so it would take some talent on our end to craft. PHP anyone? We'll see what's possible in time, just a thought.
-
 Fobgi?
 -
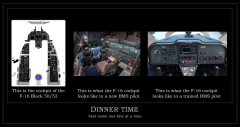 I tossed together this highly technical info-graphic to highlight the knowledge barrier that all sim pilots must bypass in order to proceed with flight training
-
- 3
-

-

-
- benchmark sims
- bms
- (and 2 more)
-
I have a curriculum I was working on many years ago, about the time a group created a website as a dedicated flight school for BMS. I figured they could do better, so it went off by the wayside. I could finalize it and assemble it into proper materials that anyone could direct a new player through. Key features included initial technical setup of controls, bindings, config, all the way through warning/threat sound training using the original TacRef from earlier versions of BMS that still had sounds to play, and of course, directing the player through the in-game Training Missions and Training Manual that accompanies it. I don't have the patience to be a trainer, I've done it a few times and I'd just about need a tranquilizer if I was to do it again. I'd rather write up materials, create instructional screenshots in PhotoShop, or short videos rather than sit in a pit and direct a new player around the cockpit.
-
Now and then, other games hook me for a short while, but I always return to my absolute favorite. I told myself I'd retrain in 4.34, and I left off at LANTIRN and Maverick training missions. Wanted to also breeze through the ILS in bad weather, too, so I'll be online more in the coming weeks. Trying to force myself to be more regular, so might make a regular flight day just so I stop falling out of practice. Been doing this for nearly ten years, but whenever I take a few months off, I end up having to re-learn how to ride that bicycle See you at Angels 20 before long!! Thanks for flying at VG!
-
 *For your three way toggle switch, set it up as buttons in the same way the encoder buttons are set - give each pole a pin, follow the circuit diagram for where to put resistors/ground/etc., and play around with it until each flip of the switch causes a single button press of whatever 3 buttons that is set to. Read the instructions on the Joystick Library link, it shows the format for the VOID SETUP bit for setting a generic joystick with so many axes and so many buttons, and add three to the buttons count for your switch. Other than that, you will need to play around and learn a bit to get it to work as I'll be unavailable and you'll not want to wait for me to work it out for you. Tons of info on this on flight sim forums of cockpit builders, I'm not the best source for info on that. Cheers!
 -
@Arnaud Just a quick update for you: I have not had a lot of time to spend on this, I've been busy and I'm not really a pro at this stuff, so I'm far less helpful than posting these questions on one of the micro-controller discussion forums. BUT I have read a bunch of them, and I went back to review a few. There are others who've wanted to use tons of rotary encoders, even asking if it's possible to do them in a matrix array like a button board does. In the end, I think the most helpful page I landed on discussed changing any pin into an interrupt. Now, I've not fully wrapped my head around it yet, as I am again busy and when I'm done, I just want to veg and play mindless games for now, but I wanted to share this with you in case you have the drive to chase it down yourself. Aside from buying the proper board for the task, something with enough interrupt pins to work out of the box for the project, it might be possible to get creative, but it will require you to learn even more about this topic to make your idea work with your current gear. Here's the link - best wishes and good luck! I may not be able to help you finish your project, but if you have any simple questions, or need to know something else about my method, feel free to ask! https://playground.arduino.cc/Main/PinChangeInterrupt/
-
*Now that I thought about it, I wonder if you need all the functions of the HSI buttons (Warp Speed/Jump Speed) and could go analog with the QNH, 1 step at a time, with a different method. I'll think about it over the next few days. It's a matter of talking to the encoder library or joystick library in some way to enact a change, and within those two libraries there may be functions to get around the interrupts, I just didn't do it for my method. We'll see. Some additional reading I'll review, you might too, on Rotary Encoders: https://dronebotworkshop.com/rotary-encoders-arduino/
-
Thanks for the heads up on the button array - I literally forgot to increment the size of the array. Didn't test (and it's late). I've edited my reply so we don't trip up the next guy who goes through all this. Cheers! If the new rotary isn't working then those pins are not Interrupt pins on that board (looks like the generic Pro Micro like I used), I literally took a shot in the dark based on what I now assume was an incorrect pinout on google images. I've looked it up proper now, and for the record, I was mistaken - there are only 5 interrupt pins on the pro-micro. 3 rotary encoders in the method I have used in my DIY would require 6 total. (quoted from: https://learn.sparkfun.com/tutorials/pro-micro--fio-v3-hookup-guide/hardware-overview-pro-micro ) There are other equally affordable boards that have more, this Pro Micro is just designed for much smaller projects. The name brand Arduino Micro shown in the top most image has 6 or 8 interrupts (off the top of my head), but is a bit pricey for a DIY at around $18. I've found a slightly cheaper version here that has 8 interrupt pins and could handle your modified sketch. Otherwise, if you bought a 3 pack of those just like I did in my DIY, you could get away with (if you have 2 usb ports open on your PC) doing 2 controllers to save money. You'd just use the same sketch but increment the Joystick ID from 0x42 to 0x43. But for $14, might as well do it right, it's up to you. Just remember for future, you can hang on to old gear for new projects later, you never know. https://www.amazon.com/Gowoops-Arduino-Leonardo-Controller-ATmega32u4/dp/B00J1X5B7Y/ *Leonardo would be required for the total of 3 rotary encoders, as it has enough interrupt pins for the task: https://www.amazon.com/Solu-Leonardo-Compatible-Revision-Atmega32u4/dp/B00R237VGO/
-
You're welcome! Adding a third rotation axis is super simple, the joystick library actually has 3 rotation axes and we've only used 2 of them. It's just a matter of adding in that Z axis in the same way we handle the X and Y, and wiring it up to a pair of Interrupt Pins, and it's button to the buttons pin array. Adding a 3-way toggle switch should work just fine as buttons, but I don't have an example I can mash in right now, and so I'll have to look into it tomorrow or this weekend, but I'm sure I can toss something together for you. You will want to learn how to wire up that 3-way switch and run an example sketch to test it, here's a simple lesson for that - his pics could be better, but you'll get the idea - I can't help you with your wiring, so you'll need to work through this to learn where to wire the resistors, ground, etc. : http://www.lucadentella.it/en/2014/08/01/interruttore-a-tre-posizioni-e-arduino/ For now, I have an example for you with the 3rd rotary encoder (Z axis), look it over and you'll see what I did to add it, it's pretty easy even for a novice because it's literally a copy of X and Y. It does matter what board you are using, this is working example with all three rotary encoders, but not the 3-way switch yet -- this sketch assumes that on your board the 9 & 10 pins are Interrupt pins (refer to the pinout for your board if this sketch doesn't work out of the box). I didn't test it, so you can do that. https://pastebin.com/gEWNgm83 (click to reveal) /* Modified HSI Knobs Sketch for Falcon BMS / DCS / FSX * with additional 3rd Rotary Encoder (Z Axis) * *(coming next: a 3-way Toggle Switch add-on) * for Arduino Micro/Leonardo / Sparkfun Pro Micro or equiv. clones * by SemlerPDX Aug2019 * VETERANS-GAMING.COM * ( in response to reply at: * http://veterans-gaming.com/index.php?/blogs/entry/32-diy-custom-game-controller-2-dial-hsi-course-and-heading-knobs/ ) * * Pins: * Rotary Encoder 1 - (OUTA-OUTB-SW) = Arduino Pins (0,1,15) * Rotary Encoder 2 - (OUTA-OUTB-SW) = Arduino Pins (2,3,6) * Rotary Encoder 3 - (OUTA-OUTB-SW) = Arduino Pins (9,10,7) * * Encoder Library * http://www.pjrc.com/teensy/td_libs_Encoder.html * * Joystick Library * by Matthew Heironimus * https://github.com/MHeironimus/ArduinoJoystickLibrary */ #define ENCODER_USE_INTERRUPTS #define ENCODER_OPTIMIZE_INTERRUPTS #include <Encoder.h> #include <Joystick.h> //Tell the Encoder Library which pins have encoders Encoder axisXRotation(0, 1); Encoder axisYRotation(2, 3); Encoder axisZRotation(9, 10); //Rotary Encoder Push Button Pins int buttonArray[3] = {15, 6, 7}; //Rotary Encoder Interrupt Pins int EncoderPin0 = 0; int EncoderPin1 = 1; int EncoderPin2 = 2; int EncoderPin3 = 3; int EncoderPin4 = 9; int EncoderPin5 = 10; //Delay Time between loops int debounceDelay = 260; //Variables to compare current to old values int oldX = 0; int oldY = 0; int oldZ = 0; int RxAxis_Value = 1; int RyAxis_Value = 1; int RzAxis_Value = 1; //Intervals for Jump/Warp Speed Rotations int JumpSpeed = 18; int WarpSpeed = 30; //Set generic joystick with id 42 with 3 buttons and 3 axes Joystick_ Joystick(0x42, 0x04, 3, 0, false, false, false, true, true, true, false, false, false, false, false); void setup() { //Set Encoder Pins as Pullups pinMode(EncoderPin0, INPUT_PULLUP); pinMode(EncoderPin1, INPUT_PULLUP); pinMode(EncoderPin2, INPUT_PULLUP); pinMode(EncoderPin3, INPUT_PULLUP); pinMode(EncoderPin4, INPUT_PULLUP); pinMode(EncoderPin5, INPUT_PULLUP); //Loop through buttons and set them as Pullups for(int x = 0; x < sizeof(buttonArray); x++) { pinMode(buttonArray[x], INPUT_PULLUP); } //Set Range of custom Axes Joystick.setRxAxisRange(0, 359); Joystick.setRyAxisRange(0, 359); Joystick.setRzAxisRange(0, 359); // Initialize Joystick Library Joystick.begin(false); } void loop() { // Loop through button pin values & set to Joystick for (int x = 0; x < sizeof(buttonArray); x++) { byte currentButtonState = !digitalRead(buttonArray[x]); Joystick.setButton(x, currentButtonState); } // Read "Heading" X Axis Rotation Encoder Knob int newX = axisXRotation.read(); if (newX > oldX) { //Determine speed of increment & set output int difX = newX - oldX; RxAxis_Value = speedVal(difX, RxAxis_Value, 1); Joystick.setRxAxis(RxAxis_Value); axisXRotation.write(newX); oldX = newX; }else if (newX < oldX) { //Determine speed of decrement & set output int difX = oldX - newX; RxAxis_Value = speedVal(difX, RxAxis_Value, 0); Joystick.setRxAxis(RxAxis_Value); axisXRotation.write(newX); oldX = newX; } // Read "Course" Y Axis Rotation Encoder Knob int newY = axisYRotation.read(); if (newY > oldY) { //Determine speed of increment & set output int difY = newY - oldY; RyAxis_Value = speedVal(difY, RyAxis_Value, 1); Joystick.setRyAxis(RyAxis_Value); axisYRotation.write(newY); oldY = newY; }else if (newY < oldY) { //Determine speed of decrement & set output int difY = oldY - newY; RyAxis_Value = speedVal(difY, RyAxis_Value, 0); Joystick.setRyAxis(RyAxis_Value); axisYRotation.write(newY); oldY = newY; } // Read "QNH" Z Axis Rotation Encoder Knob int newZ = axisZRotation.read(); if (newZ > oldZ) { //Determine speed of increment & set output int difZ = newZ - oldZ; RzAxis_Value = speedVal(difZ, RzAxis_Value, 1); Joystick.setRzAxis(RzAxis_Value); axisZRotation.write(newZ); oldZ = newZ; }else if (newZ < oldZ) { //Determine speed of decrement & set output int difZ = oldZ - newZ; RzAxis_Value = speedVal(difZ, RzAxis_Value, 0); Joystick.setRzAxis(RzAxis_Value); axisZRotation.write(newZ); oldZ = newZ; } //Send Joystick info through USB Joystick.sendState(); delay(debounceDelay); } //Function to set Rotation value adjusted for the turning speed int speedVal(int dif, int val, int dir){ if (dif >= WarpSpeed) { if (dir == 1) { val = val + WarpSpeed; }else{ val = val - WarpSpeed; } }else if (dif >= JumpSpeed) { if (dir == 1) { val = val + JumpSpeed; }else{ val = val - JumpSpeed; } }else{ if (dir == 1) { val = val + 1; }else{ val = val - 1; } } //Correct Rotation within 360 deg. if (val < 0) { val = val + 360; }else if (val >= 360) { val = val - 360; } return val; }
-
In Portland, Oregon, where Darth Vader rides a unicycle while wearing a kilt and playing bag pipes that shoot fire around the Skidmore district, we have a saying, "Keep Portland Weird"
.... So this just happened, an official local brew from Portland Brewing:

-
-
1
-
- Report
-

About 2nd pic …… few seconds later forklift came around the corner and SMMAAATTCCHHHEEEDDDD mr. unipiper!!!!
-
-
1
-
- Report
-
 ....and then a few seconds later, "Portland Brewing announces it's newest beer: Smashed Unipiper with Bits of Forklift IPA"
-
You know i came from the logistic buisness warehouses etc.
When i see your fucking american type pallets … pure hate.
With the standard warehouse equipment like forklift, reachtruck or slipsheet it's to shitty to handle.
-
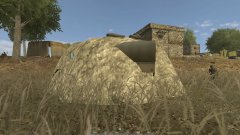
Just got home from two weeks in the Mt. Hood National Forest. Went up for the duration of the Perseid Meteor Showers and stayed through the 20th. It was great to get unplugged for awhile. Dug a pit and sunk a chopping block for my axe, and went through piles of wood. A white pine was downed just up the road, so I had a huge supply of 15" rounds to buck up and split. My shoe busted less than halfway through the trip and I used some camo colored duct tape to keep them together for the rest of my vacation, and looking halfway decent, too. I spent a bit of time floating in the eddies created by these two rivers joining at the Fan, the split one actually being one river, and you don't continue down river unless you really try to get into the flow. It's a nice spot to swim, but due to it's cold temperature (50-55 deg. F), most people bring something to float on. I took quite a few pictures with my old Nikon COOLPIX L30 on a tripod: I was very simplified and didn't bother cooking at all, just things that need boiling water, cheese & crackers, or hotdogs over the fire, granola bars, and such. And lots of coffee... I went shooting almost daily with my replica 1870's Henry Repeating Rifle. It's a carbine in .45 Long Colt, 10 rounds tube fed. The Henry was the first rifle that combined the bullet, gunpowder, and primer into a single shell, and while it was not standard issue in the Army, many soldiers saved their pay to buy one because they felt it could save their life. I shoot at 80 feet, which about as far as I can generally find a flat and open area to shoot in the valley where I camp. That's around 26 yards, or 24 meters, the distance over my shoulder in the pic to the target. I shoot with iron sights and at that range the front sight is larger than the 10-point ring in the center of the target. After one volley of 10 rounds, I circle my shots so I can count later. Ran out of my NRA 100 yard rifle targets and had to buy these "sighting-in" sheets when I went to the nearest small town for ice and resupply mid-trip. These camp robbers are extremely bold birds, and will literally land on your chair, arm, shoulder, hat... We toss snacks around to bring them in like fruit and nuts. Rather than follow the whole "don't feed the animals" idea, we just give in and see how close we can get them for pictures and such. The bats under the bridge are rather small, around 3 inches (or 8cm) long and they concentrate there at night to feed. I brought a handheld torch bright enough to dwarf the flash on the camera, and put the camera on a tripod so I could get it up into the high spaces of the bridge. I caught one in mid-flight trying to investigate my camera on a pole and even felt his wings smack the side of the pole when he came in close. Another one was completely oblivious or didn't care about my camera and I kept getting closer until I was in macro mode just a few inches from his face - it was hard to hold still enough to get a good shot, these are the two out of literally 20 pictures that turned out decent: (click photos for full size images)

- 6 replies
-
- 14
-
-
-
PR COOP Server Reports thread 1.6
=VG= SemlerPDX replied to BinkleDinkle's topic in PR Server Reports
Ciro was away, then I was away, now afaik, we are both around and will be resolving the issues with the server and TCAdmin in the very near future. Problems that have persisted through July and August should soon be a thing of the past, as well as these server hang issues that have popped up. If it were something simple, we would have fixed it already, but this will require server downtime and some heavy work based on our earlier estimates. We'll keep you all informed and will make separate public announcements once we get rolling. Just wanted to respond here as there seems to be questions about why this is happening, and I thought we made that clear to everyone when TCAdmin went belly-up after an attempted update in July, and subsequent failures to get together and resolve it due to real life issues and prior engagements we could not control or ignore, that the servers would be running less efficiently until fixed. Thank you all for your patience! -
Coming soon to Elite Dangerous:Details have been released regarding the Fleet Carrier as well as the Frontier Points that can be earned in-game to buy cosmetic items that were previously only available for purchase (with real money) from the Frontier Store. *I have several billion in-game credits and will be purchasing a Fleet Carrier for the VETERANS-GAMING Squadron in Elite: Dangerous as soon as they release in December, and will place it based on current group activities to support whatever we are doing, and will outfit it to most benefit our current in-game operations. Will be happy to re-tool and re-fit it, as well as re-locate it when needed, based on group decision. And standing open invitation to anyone who wants to learn some killer in-game money making strategies that will help you afford your own Fleet Carrier in no time, just let me know! Videos and guides help, but nothing is faster than flying around with someone and learning while making half a billion credits in one gaming session!
-
- 3
-
-
-
- arx
- elite dangerous
- (and 3 more)
-
Suuuure. Because in Win7, the PR icon has the exact same problem.... See what I mean? You make very fair points, but if it was working well in XP, and in Win7, why would anyone at PR need to do anything to improve or change the way the .exe works? I get that perhaps they did not follow a "standards and practices" method for the creation of those .exe's, and I'm not Microsoft Certified - certainly can't speak for the "how" things are supposed to be done... but the issue remains: Worked fine in XP & Win7 -- Yet again, Win10 must have changed something that did not need to be changed for seemingly no other reason than to do something different regardless of positive/negative operation of the existing system. Speculation, I know, but my point stands. Win10 is a pain.
-
Patience is a virtue. I would never recommend to anyone to download a non-game from Steam. I could list the reasons, but it's pretty obvious that one program being dependent upon another that force updates it is NOT acceptable. This is the case for a number of utility programs that can be downloaded for free, and also from Steam. NEVER use Steam if you can avoid it, if you simply want proper control over your programs. Here's a negative review from a Blender user on Steam who was very happy with the old version 2.79 user interface and was very upset that Steam force-updated him to a version he did not want. Like anyone, if you are used to a program, it's best to research the next version first and evaluate if it's time to change over so you can wait for any plugins you use to update, or in case there will be an added learning curve that would derail any existing projects or workflow:
-
Same color as the Start Menu background? Have you not seen my Win10 article? (shameless plug) ---scroll to middle "Look and Appearance" section Nice workaround! I had not noticed that the Start In field was blank, but in my defense, I spent a total of 2 minutes 4 years ago realizing that Win10 doesn't want to play nice with the PR launcher pinned to Start Menu, so I didn't bother. And, while you're workaround method works 90%, it's not complete and that is not your fault. This is a Windows 10 issue, and/or the way PR runs in Win10, and I'm not going to keep jumping through hoops for Windows 10 and chase my tail over some icon that doesn't want to pin correctly like every other program on my computer. Besides, I've had this all on voice control for so long, I wouldn't bother taking up space on my Start Menu anyway. But for the record, the 10% of this workaround that doesn't work is the icon bit. I bet I could copy the icon to some location on C: drive and jerry-rig it up to look right, but case in point, Win10 sucks and here's why I don't use the Start Menu icon to launch PR:
-
Just look at home page. It is on Calendar now, that will show in your local time zone.